Nov 14, 2024
Here are a list of command line apps that could be useful
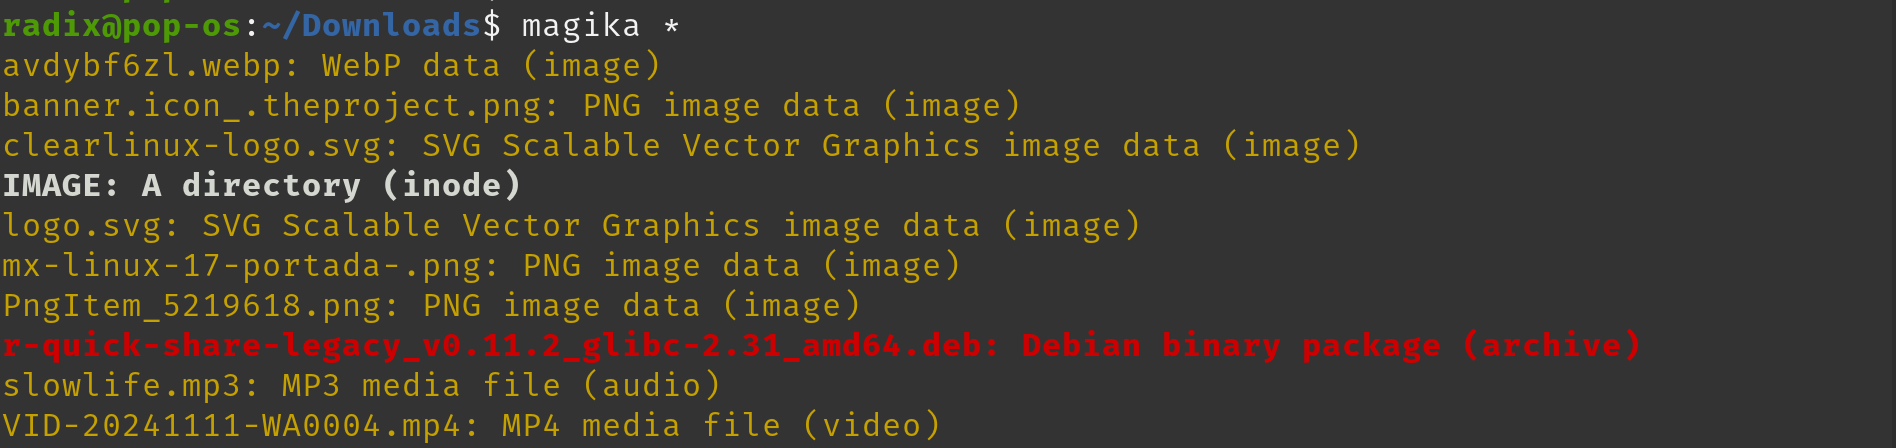
A very fast file type detection.
You can start using Magika by installing it as a Python package: pip install magika
The Stress Terminal UI: s-tui
s-tui, monitors CPU temperature, frequency, power and utilization in a graphical way from the terminal.
You can start using s-tui by installing it as a Python package: pip install s-tui
if you have install the stress program, you can activate it within s-tui to monitor the system activities created by stress.

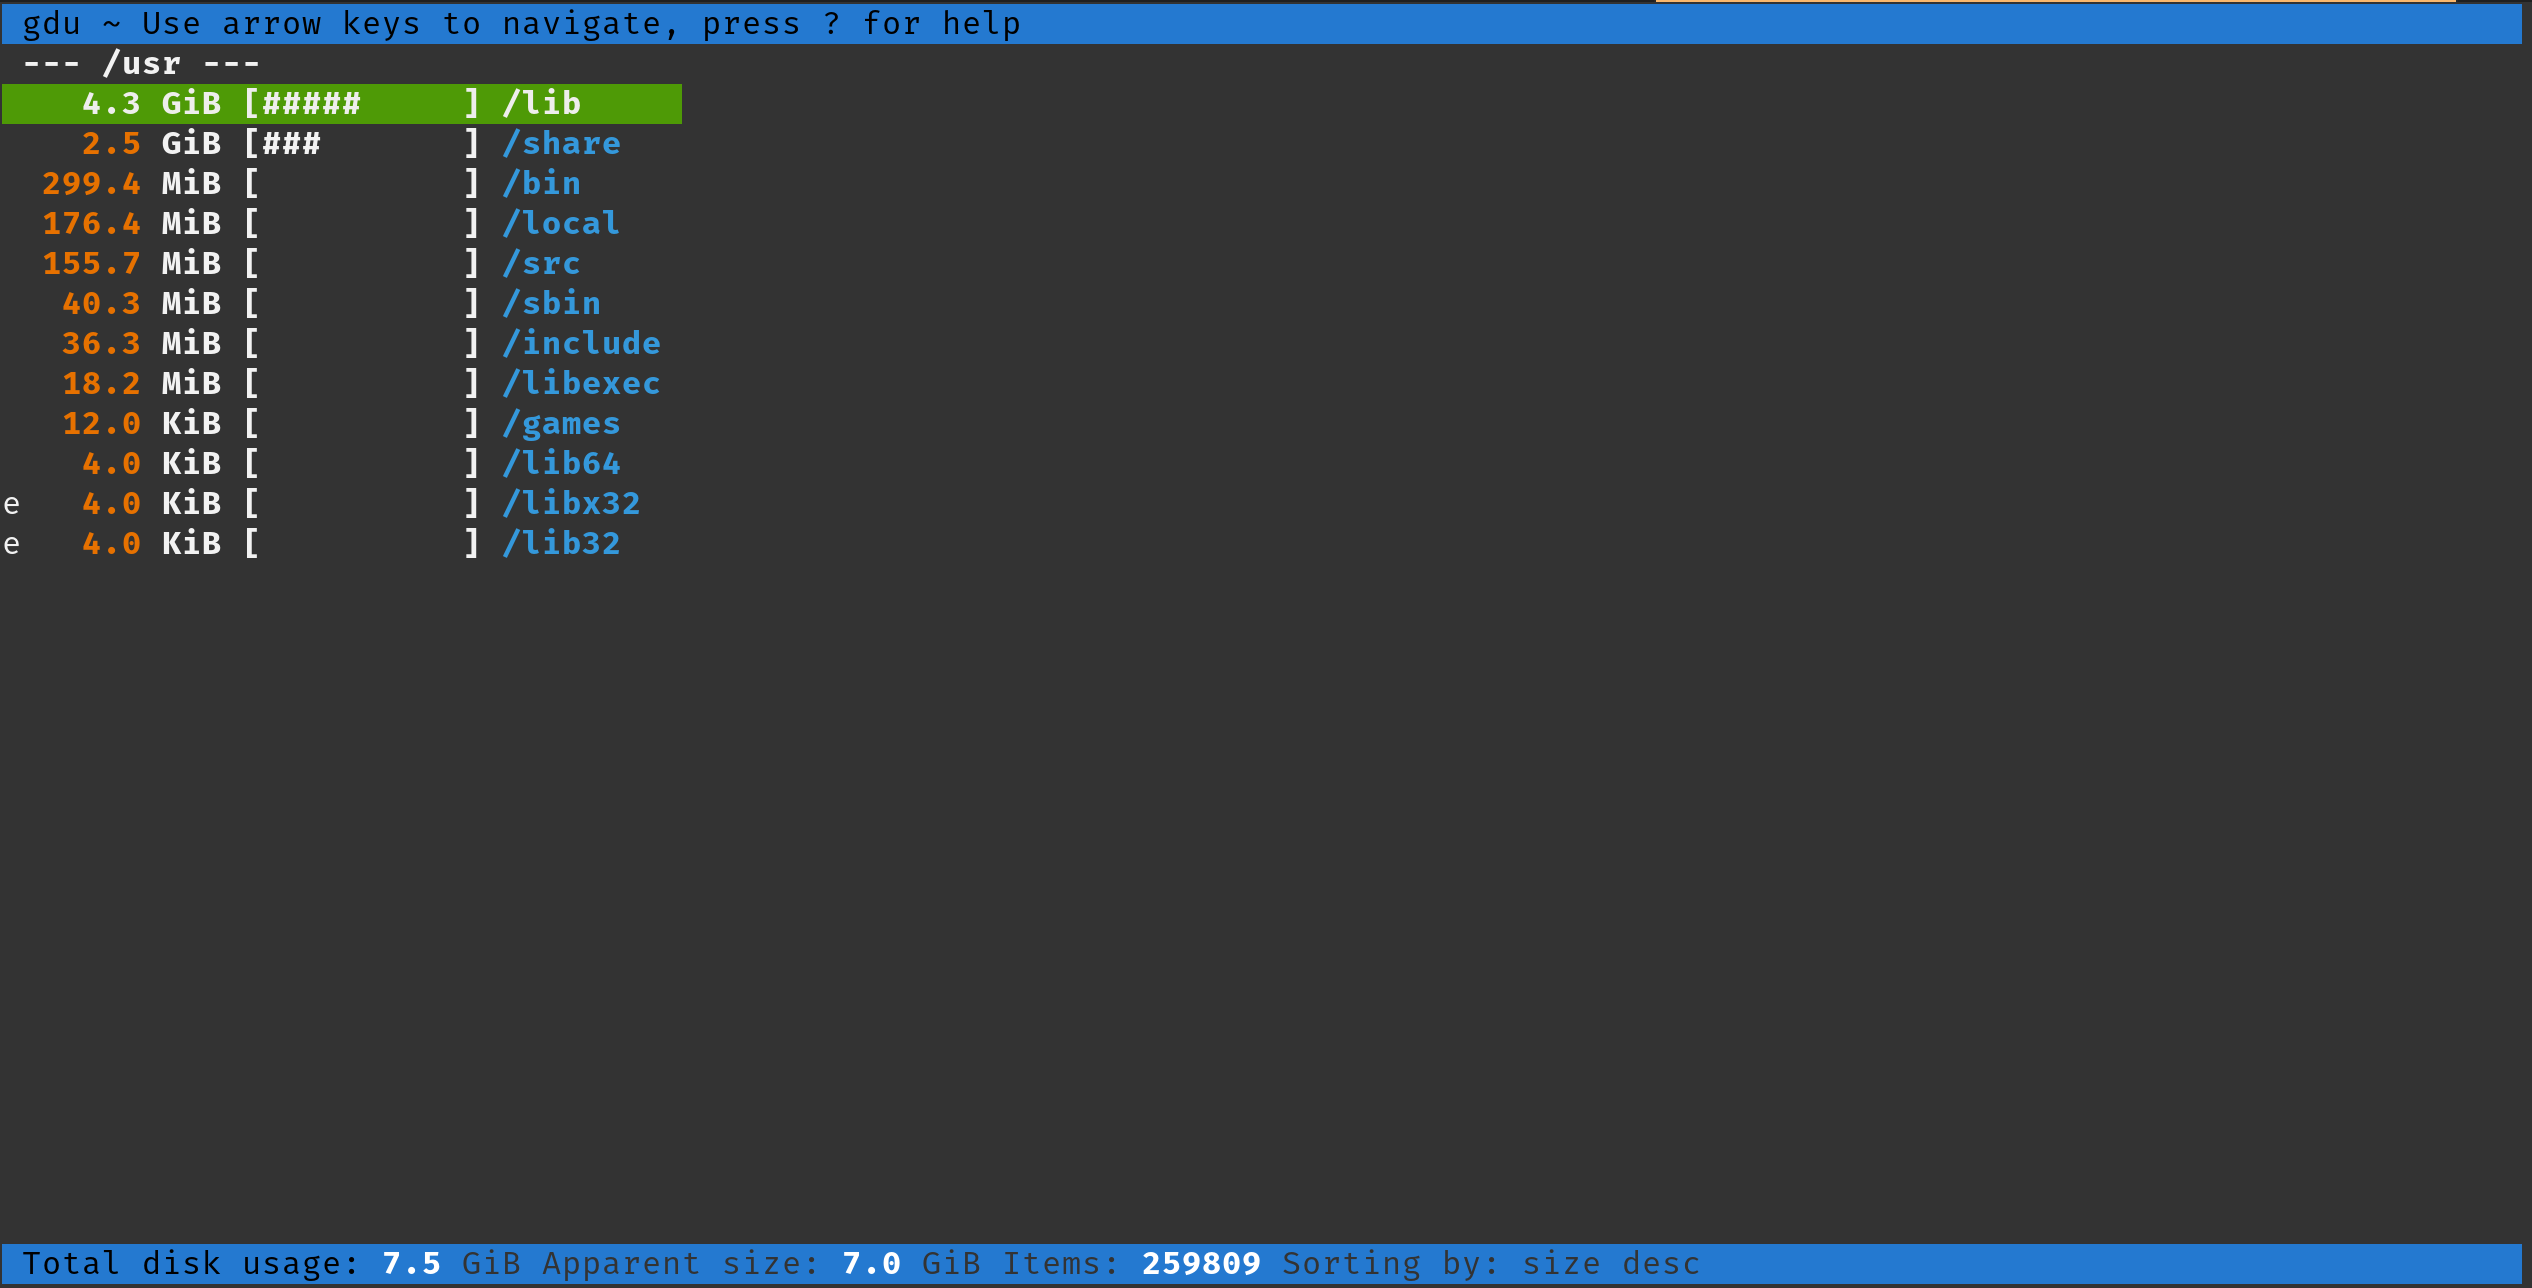
A fast disk usage analyzer written in Go.
Gdu is intended primarily for SSD disks where it can fully utilize parallel processing.
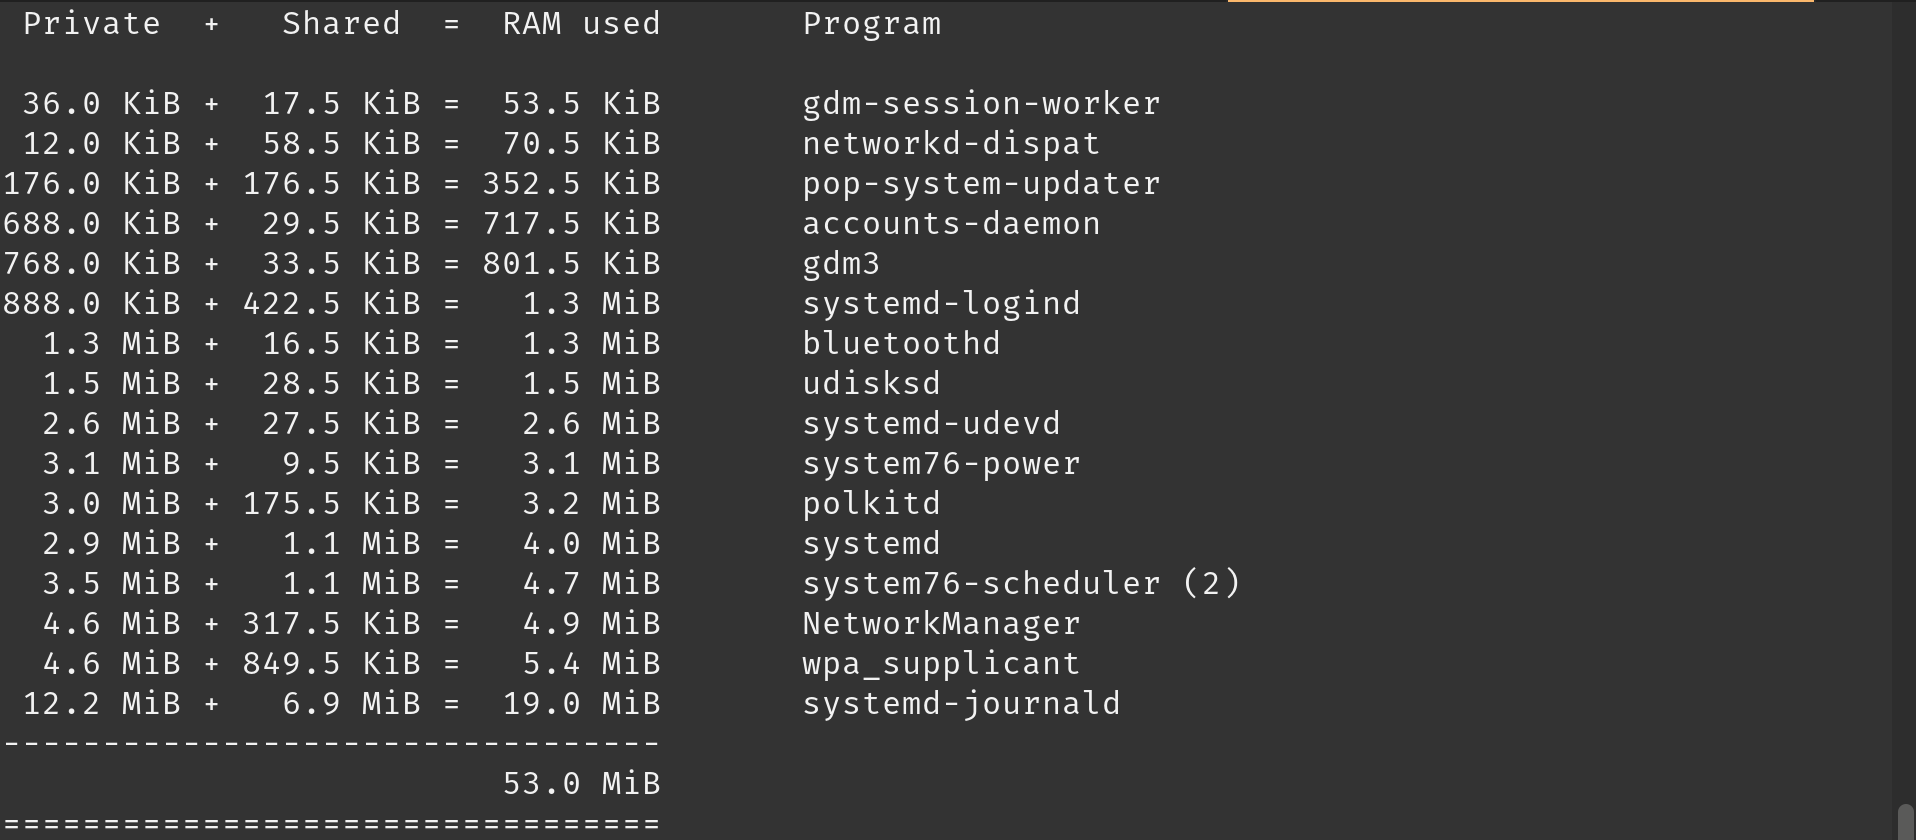
A utility to accurately report the core memory usage for a program
You can start using ps_mem by installing it as a Python package: pip install ps_mem
Nov 08, 2024

rhsecapi makes it easy to interface with the Red Hat Security Data API.
From the RPM info in the rhsecapi package:
Leverage Red Hat's Security Data API to find CVEs by various attributes (date,
severity, scores, package, IAVA, etc). Retrieve customizable details about
found CVEs or about specific CVE ids input on cmdline. Parse arbitrary stdin
for CVE ids and generate a customized report, optionally sending it straight to
pastebin. Searches are done via a single instantaneous http request and CVE
retrieval is parallelized, utilizing multiple threads at once. Python requests
is used for all remote communication, so proxy support is baked right in.
BASH intelligent tab-completion is supported via optional Python argcomplete
module. Python2 tested on RHEL6, RHEL7, & Fedora but since it doesn't integrate
with RHN/RHSM/yum/Satellite, it can be used on any internet-connected machine.
Feedback, feature requests, and code contributions welcome.
This tool make it easy to make a query regarding a CVE against RH suite of products and check how are they affected.
A simple query on a CVE
$rhsecapi CVE-2024-3094
 [NOTICE ] rhsda: Found 1 CVEs on cmdline
 [NOTICE ] rhsda: Valid Red Hat CVE results retrieved: 1 of 1

 CVE-2024-3094
  SEVERITY : Critical Impact
  DATE     : 2024-03-29
  BUGZILLA : 2272210
  FIX_STATES :
  Not affected: Red Hat Enterprise Linux 6 [xz]
  Not affected: Red Hat Enterprise Linux 7 [xz]
  Not affected: Red Hat Enterprise Linux 8 [xz]
  Not affected: Red Hat Enterprise Linux 9 [xz]
  Not affected: Red Hat JBoss Enterprise Application Platform 8 [xz]
Another query that also shows the relevant RHSA
rhsecapi CVE-2023-4911
[NOTICE ] rhsda: Found 1 CVEs on cmdline
[NOTICE ] rhsda: Valid Red Hat CVE results retrieved: 1 of 1
CVE-2023-4911
 SEVERITY : Important Impact
 DATE     : 2023-10-03
 BUGZILLA : 2238352

 FIXED_RELEASES :
  Red Hat Enterprise Linux 8: [glibc-0:2.28-225.el8_8.6] via RHSA-2023:5455 (2023-10-05)
  Red Hat Enterprise Linux 8: [glibc-0:2.28-225.el8_8.6] via RHSA-2023:5455 (2023-10-05)
  Red Hat Enterprise Linux 8.6 Extended Update Support: [glibc-0:2.28-189.6.el8_6] via RHSA-2023:5476 (2023-10-05)
  Red Hat Enterprise Linux 9: [glibc-0:2.34-60.el9_2.7] via RHSA-2023:5453 (2023-10-05)
  Red Hat Enterprise Linux 9: [glibc-0:2.34-60.el9_2.7] via RHSA-2023:5453 (2023-10-05)
  Red Hat Enterprise Linux 9.0 Extended Update Support: [glibc-0:2.34-28.el9_0.4] via RHSA-2023:5454 (2023-10-05)
  Red Hat Virtualization 4 for Red Hat Enterprise Linux 8: [glibc-0:2.28-189.6.el8_6] via RHSA-2023:5476 (2023-10-05)
  Red Hat Virtualization 4 for Red Hat Enterprise Linux 8: [redhat-release-virtualization-host-0:4.5.3-10.el8ev] via RHSA-2024:0033 (2024-01-03)
  Red Hat Virtualization 4 for Red Hat Enterprise Linux 8: [redhat-virtualization-host-0:4.5.3-202312060823_8.6] via RHSA-2024:0033 (2024-01-03)
FIX_STATES :
 Not affected: Red Hat Enterprise Linux 6 [glibc]
 Not affected: Red Hat Enterprise Linux 7 [compat-glibc]
 Not affected: Red Hat Enterprise Linux 7 [glibc]
UPDATE : There is a version that supports python3 used in RHEL8/9. You can get it here
Download-RPM
One problem is that rhsecapi needs python2 so it is problem getting it to run on anything newer than RHEL7. There is an option to run it in a docker container.
This is the method I ended up using to run rhsecapi.
distrobox which used podman to create a Centos 7 container then install the rhsecapi rpm.
[bogus@myhost ~]$ distrobox enter --root centos7
[bogus@centos7 ~]$ rhsecapi -h
usage: rhsecapi [--q-before YYYY-MM-DD] [--q-after YYYY-MM-DD] [--q-bug BZID]
[--q-advisory RHSA] [--q-severity IMPACT]
[--q-product PRODUCT] [--q-package PKG] [--q-cwe CWEID]
[--q-cvss SCORE] [--q-cvss3 SCORE] [--q-empty]
[--q-pagesize PAGESZ] [--q-pagenum PAGENUM] [--q-raw RAWQUERY]
[-i YYYY-?-NNNN] [-x] [-0] [-f FIELDS | -a | -m] [-p PRODUCT]
[-j] [-u] [-w [WIDTH]] [-c] [-l {debug,info,notice,warning}]
[-t THREDS] [-P] [-E [DAYS]] [--dryrun] [-h] [--help]
[CVE-YYYY-NNNN [CVE-YYYY-NNNN ...]]
Run rhsecapi --help for full help page
VERSION:
rhsecapi v1.0.1 last mod 2017/06/27
See http://github.com/ryran/rhsecapi to report bugs or RFEs
Jun 15, 2022
Living with Secure Boot
I bought a new laptop Aspire A515-45, AMD 6 core Ryzen 5 5500U with Radeon Graphics, 16Gb DDR4 ram and 512Gb nvme SSD.
It comes preloaded with Windows 11 and therefore secure boot is enabled by default. Installed AlmaLinux 8.6 with minimal issues, just remember to mount /boot/efi to the first partition of the SSD drive. The Almalinux shim is already correctly signed so there were no issues with booting up the system.
Drivers for the wifi, Intel Wi-Fi 6 AX200 and ethernet, Realtek RTL8111/8168/8411 PCI Express Gigabit Ethernet were loaded correctly.
However the drivers for the AMD integrated Radeon graphics were quite basic. AMD provides better graphic drivers ( AMDGPU ) obtained from http://repo.radeon.com/amdgpu-install/. RPM packages for RHEL 8.6 are available. Installation also involves the creation of the amdgpu kernel module. As the newly created amdgpu module is unsigned, it was not loaded during bootup. Similarly manual loading will not work due to the secure boot environment.
A mok certificate had been been created which need to be imported before the amdgpu kernel module is permitted to load.
mokutil --import /root/mok.der
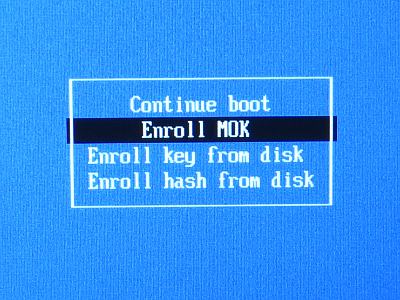
Mokutil will require you to provide a temporary password for importing the certificate. Reboot the system and the MOK manager will start automatically.
Information on how the Mok enrollment screens can be found here.
Use to temporary password to complete the importing of the certificate. The amdgpu driver will now loads correctly.
New Issues
I noticed a new problem where upon resumption from standby, the display remains blank. The system is running but there is no display, only a reboot will bring it back.
Apparently this is an issue on AMD CPU concerning standby, only a newer kernel has the fix for this issue. The current kernel is kernel-4.18.0-372.9.1.el8.x86_64.
Recommendation was to use a version 5 kernel. Instead of compiling a kernel, I took a kernel rpm from ELRepo Project.
It had current stable kernel version release 5.18.1-1.el8.elrepo.x86_64.
I installed the elrepo kernel and upon reboot, the new kernel fails to load. This was expected as the secure boot does not have the public certificate for elrepo. I turned off secure boot setting in the BIOS and the 5.18 kernel booted up just fine. The standby issue is resolved.
Apparently the elrepo kernel and modules are unsigned, therefore this is no public certificate to import. In order to re-enable secure boot and permit the loading of the elrepo kernel, I would need to create my own set of keys/certs and sign the elrepo kernel and kernel modules.
I used the information at this link to get the elrepo kernel/modules signed.
How to sign things for secure boot
I needed to build these packages for the sbsign utility
gnu-efi-3.0.11-6.fc34.src.rpm
sbsigntools-0.9.4-4.fc34.src.rpm
sbsign is used to sign the kernel binary.
I found kmodsign in my system as provided by the snap package. It was used to sign the kernel modules.
Alternately you could use sign-file to sign the modules. It comes from the kernel-devel rpm. See link below for information on this alternate kernel module signing process.
signing-kernel-modules-for-secure-boot
For the kernel module signing process, you will need to uncompress the kernel modules to .ko, sign them and compress them back to ko.xz.
After importing the self created certificate with the Mok utility and re-enabling secure boot. The elrepo kernel/modules were able to load successfully.
Jun 09, 2022

What's up with Secure Boot
Secure boot was implemented in the release of Windows 8 in 2012. Microsoft introduced digitally signed kernel files for Windows PE, Windows RT, Windows 8, and Windows Server 2012.
With the release of Windows 11 in 2021, Secure Boot became a mandatory requirement in PC systems preloaded with Windows 11.
Secure Boot is one feature of the Unified Extensible Firmware Interface (UEFI) 2.3.1 specification (Errata C). The feature defines an entirely new interface between operating system and firmware/BIOS.
When enabled and fully configured, Secure Boot helps a computer resist attacks and infection from malware. Secure Boot detects tampering with boot loaders, key operating system files, and unauthorized option ROMs by validating their digital signatures.
After Secure Boot is enabled and configured, only software or firmware signed with approved keys are allowed to execute. Conversely, software signed with blacklisted keys are disallowed from executing.
Secure Boot is split into several pieces and stages.
db, the “signature database.” Entries here (typically certificates) determine what EFI executables are allowed to run on the device. So this is an “allow” list.
dbx, the “forbidden signatures database.” Entries here are typically SHA256 hashes of specific UEFI binaries, i.e. those things that were signed by a certificate in the “db” list but later found to be bad (e.g. having a security vulnerability that compromises the firmware). So this is a “block” list.
kek, the “key exchange key.” This specifies who is able to update the signature database (the “db” and “dbx” keys). Interestingly, any UEFI binaries signed by the “kek” key can also boot on the device. Microsoft's certificate will be stored here.
pk, the “platform key.” The “pk” variable contains a single certificate that controls access to the “kek” and “db” variables. If this value is cleared, it effectively turns off Secure Boot (putting the device in setup mode). For example, if the manufacturer of the hardware is Dell, then their certificate will be stored here.
For Linux systems, a special boot loader Shim created by Matthew Garrett is used to integrate with the Secure Boot setup. It manages its own certificates. Ubuntu, Red Hat, SUSE, and Debian generate their own versions of Shim that include certificates issued by their companies.
Verisign/Symantec for a fee will digitally signs the Shim bootloader on behalf of Microsoft that the UEFI firmware will permit the loading of the Shim. Once Shim is loaded, it operates independently of the Microsoft verification chain. Shim has built-in certificate management that lets the owner of the computer store certificates called machine owner keys (MOKs).
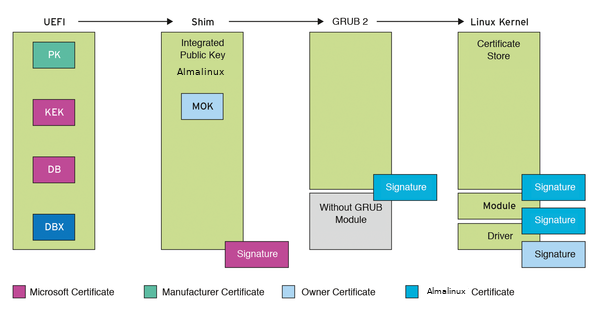
Shim lets large distributors such as Ubuntu, SUSE, and Red Hat win back control of hardware. Using the Distribution certificate stored in Shim, The Distribution sign the GRUB 2 bootloader. The firmware boots Shim, Shim boots GRUB 2, and GRUB 2 boots the operating system.
A Machine Owner Key (MOK) is a type of user generated key that is used to “sign," or authenticate as trustworthy, an Extensible Firmware Interface (EFI) binary. MOK gives you ownership of the boot process by allowing you to run locally-compiled kernels, kernel modules or boot loaders not delivered with the Linux distribution. This means that to use custom kernel or kernel modules, A public MOK needs to be enrolled and the private MOK is used to sign the custom kernel and kernel modules.
Jul 30, 2021

In ALMALinux/Centos/RHEL 8, tcp_wrappers support was removed from the openssh daemon. This was already done sometime back in Fedora 28 release. Reasons given were as follows:
This was very useful 20 years ago, when there were no firewalls in Linux. This is not the case for today and connection filtering should be done in network level or completely in application scope if it makes sense.
While firewall rules can provide similar functionality but tcp_wrappers is still handy in some situations.
TCP Wrappers (also known as tcp_wrappers) is a host-based networking ACL system, used to filter network access to Internet Protocol servers on (Unix-like) operating systems such as Linux or BSD. It allows host or subnetwork IP addresses, names and/or ident query replies, to be used as tokens on which to filter for access control purposes. Let's do a bit of history first on the origins of tcp_wrappers.
The story begins in 1990 at Eindhoven University of Technology where Wietse Venama was administrator of the computer system network. Wietse is also the creator of the Postfix SMTP server. The university system was coming under increasingly heavy attacks from a Dutch computer cracker who was consistently able to gain root privilege. The cracker was skilled at typing the following command sequence:
rm -rf /
One night, Wietse noticed the cracker was watching him over the network, making contact with the finger network service. Since finger does not require a password, he was finally able to explain why much of the crackers activities had gone unnoticed. Wietse’s first reaction was to shutdown the finger network service. Instead, he decided it would prove more beneficial to maintain the service and determine where the finger requests were coming from. The solution he found was to make a swap by moving the vendor provided network server programs to another location, and install a trivial (TCP Wrapper) program in their place. Whenever a connection was made, the trivial program would just record the name of the remote host and then run the original network server program. The first TCP Wrapper version was just a few lines of code that Wietse carefully copied from an old network daemon source. Because it did not exchange any information with the client or server processes, the same TCP Wrapper version could be used for many types of network services. He made several improvement to the software and used to monitor the cracker activities. However the cracker was never caught. He maintained it until 1995, and on June 1, 2001, released it under its own BSD-style license.
The following attributes of TCP Wrappers are of prime importance:
- Wrappers can be installed without any changes to existing software, or to existing configuration files.
- The wrapper programs have no interaction with the client user.
- The wrappers have no interaction with the server application.
- Once the wrappers have established interaction between client and server, the wrapper disappears. Consequently, there is no overhead on either end.
In the previous version of Centos/RHEL before release 8, the openssh daemon, sshd had the libwrap library compiled in. This means the tcp_wrapper feature was supported and it worked in the following manner.
tcp_wrapper looks at the content of two files to determine access to network services:
/etc/hosts.allow
/etc/hosts.deny
rules in /etc/hosts.allow is processed first.
If you want to explicitly allow localhost full access and block 192.178.0.114 from accessing sshd, the contents of the two files are as follows
/etc/hosts.allow
ALL: 127.0.0.0/8
/etc/hosts.deny
sshd: 192.168.0.114
sshd because of the libwrap library will honor the hosts.deny entry and refuse ssh connection from the host 192.168.0.114. Any modification to the files will take immediate effect.
I have been using tcp_wrapper to block ssh brute force attacks. A background program watches the /var/log/secure for failed attempts to login via ssh. After 3 failed tries, the IP address of the attacker is entered into /etc/hosts.deny file and that attacking host is blocked instantly.
While this can also be done by creating a firewall rule to DROP/REJECT connection from this attacker. I find the tcp_wrapper approach to be simpler and I have a list of the offending IPs in one file.
This approached had work very well for many years until Centos release 8. The openssh no longer has the libwrap library. So I used Fail2Ban to block ssh brute force attacks instead. It will block the attacking IPs by creating firewall rules via firewalld.
Recently I wanted to try to find a way to use tcp_wrapper like mechanism to block ssh brute force attacks. After review some options I reread this link and it provided a way to incorporate tcp_wrapper support to sshd. In fact, the methodology is very similar to the approach used in the 1990s when Wietse implement tcp_wrappers.
The implementation is as follows:
Install tcp_wrappers
yum install tcp_wrappers
cd /etc/systemd/system/
cp /usr/lib/systemd/system/sshd@.service .
edit sshd@.service
CHANGE THIS LINE
ExecStart=-/usr/sbin/sshd -i $OPTIONS $CRYPTO_POLICY
TO
ExecStart=@-/usr/sbin/tcpd /usr/sbin/sshd -i $OPTIONS $CRYPTO_POLICY
IF SELINUX is enforced, this seboolean needs to be turn on
setsebool ssh_use_tcpd on
getsebool ssh_use_tcpd
ssh_use_tcpd --> on
Stop the current ssh service and start the sshd socket
systemctl stop sshd; systemctl start sshd.socket
To make it permanent remember to disable sshd.service and enable sshd.socket
the tcpd program will checks on the /etc/hosts.allow and /etc/hosts.deny (create them first) files before running the sshd program. Essentially the same tcp_wrapper functionality is back in place. I can now run my ssh brute force blocking program again.
Jun 03, 2021
 I had encountered scenarios when I had a system lockup and I needed to identify, if it was a software or hardware issue. Most of the time it is due to some hardware issue, maybe due to insufficient cooling or memory problems.
First thing to do is to boot up a OS live CD or the system rescue ISO. System rescue ISO is a good choice as it will bring a full desktop you can then run some apps to bring on the system lockup. The idea is to run software that is not from your boot drive to determine if software is the cause of the problem. If it runs well then there may be software or data corruption issues with your OS drive.
However if the same system lockup is observed then it time to focus on the hardware.
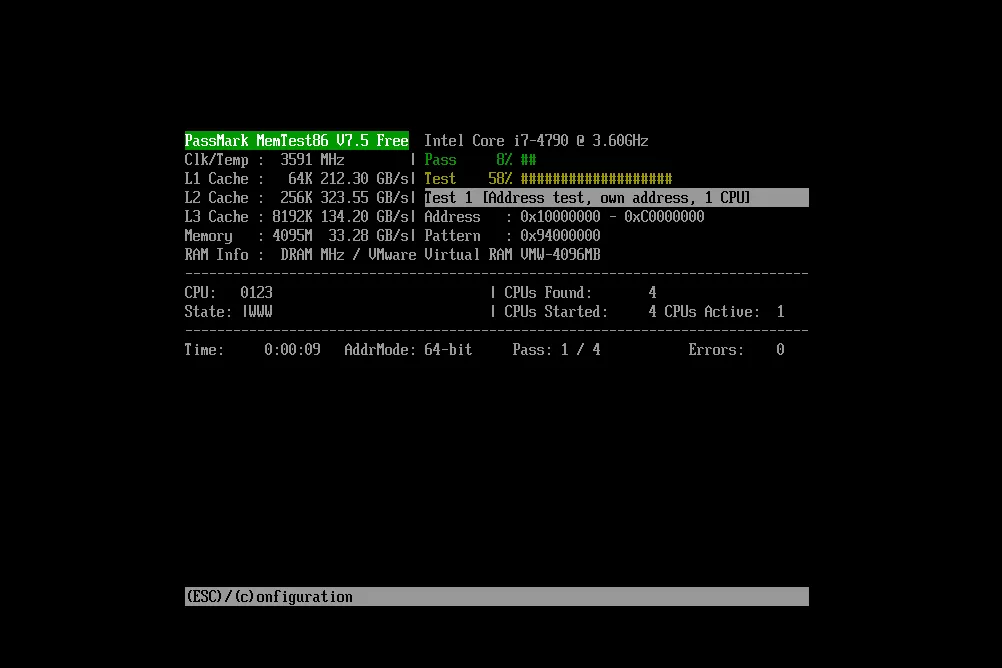
To do full memory testing, you would need to bootup a environment with the test software to rigorous run different test patterns on the full bank of memory multiple time. Here are some software to do this
memtest86 is a memory test software program designed to test and stress test an x86 architecture computer's random-access memory (RAM) for errors, by writing test patterns to most memory addresses, reading back the data, and comparing for errors. Each tries to verify that the RAM will accept and correctly retain arbitrary patterns of data written to it, that there are no errors where different bits of memory interact, and that there are no conflicts between memory addresses. It was developed by Chris Brady in 1994. In February 2013, the original MemTest86 was sold to PassMark. Currently there is a commercial version and a free version. Both will support UEFI booting but only from a usb drive image.
memtest86+ is a fork of memtest86 released under the GNU General Public License (GPL) in 2004. The most recent update is on 4th Dec 2020. It has a ISO release but does not support UEFI boot.
pcmemtest pcmemtest is a fork and rewrite of memtest86+, which in turn was a fork of memtest86. The purpose of the rewrite was to:
- make the code more readable and easier to maintain
- make the code 64-bit clean and support UEFI boot
- fix failures seen when building with newer versions of GCC
It is based on the 4th Dec 2020 v5.01 release of memtest86+. You would have to get the source code and built the binaries and create the ISO file. It has all the build scripts and Makefiles. The only problem I faced in the build process was a syntax error in the pcmemtest-1.4/build64/Makefile
lines 103 and 107 had the syntax problem
$(eval SIZES=$(shell size -G -d memtest_shared | grep memtest_shared))
change it to remove the -G option
$(eval SIZES=$(shell size -d memtest_shared | grep memtest_shared))
the build process completed with no problems after the change and just one more step ( make iso ) to create the ISO file. Now I have a memory test ISO that support UEFI boot.
You can download it here
memtest.iso
In the past, I had used memtest86 to verify faulty dimm modules. It was also useful to boot the ISO on the PC shop system to show the memory failure to the shop owner to convince him to give me a replacement memory module.
Jun 03, 2021
In past, I would make a bootable usb drive from the archlinux ISO for installation purposes and forget which I put it. On one occasion, I had a boot issue and needed to "rescue" the archlinux. Because I could not find the archlinux usb drive, I had to download the ISO and make another boot device.
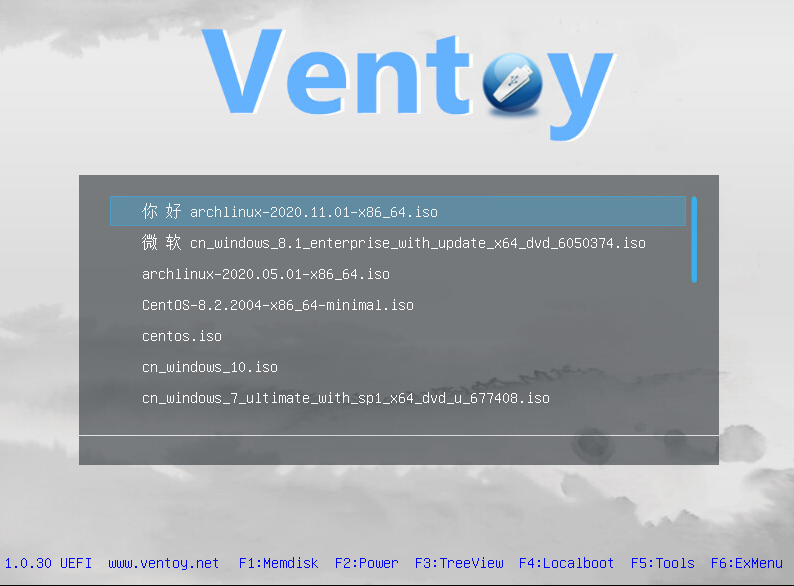
This week I heard about a software tool called Ventoy from the Late Night Linux podcast. It will allow multiple ISO to reside in one usb drive and it will create a menu list upon boot for the user to choose the specific ISO to boot. It supports both Windows and Linux environments and the default filesystem it uses for the storage partition in the usb is the exFAT filesystem. Of course you can reformat this storage partition to any other linux file system of your choice. You just copy into the storage partition the ISOs and boot the usb drive to use any one of them.
One caveat is that only ISOs that support UEFI boot can be used. For example, this Ultimate Boot CD iso did not boot as it did not support UEFI boot.
Use a USB 3.0 usb drive for more tolerable boot speed and the appropriate size for all the ISOs you want to put in it.
Here is my list of ISOs for OS rescue, system test, partition sizing, disk cloning and general troubleshooting.
- Almalinux 8.4 RHEL 8.4 clone
- Centos 7 RHEL 7 clone
- Archlinux A very very up to date linux distribution
- Rescatux is a Debian-based live distribution featuring a graphical wizard for rescuing broken GNU/Linux and Windows installations and boot loaders.
- SystemRescue Archlinux based rescue toolkit.
- Gparted Manage disk partitions ( create,delete, resize, copy, and move partitions without data loss)
- Clonezilla is a partition and disk imaging/cloning program similar to True Image® or Norton Ghost®. It helps you to do system deployment, bare metal backup and recovery.
- PCmemtest memory tester is based on a fork and rewrite of Memtest86+
Apr 01, 2021
 The Centos Linux distribution was first released in 2004. It fulfilled its promise as a free and binary compatible version of RHEL ( Red Hat Enterprise Linux ). The project is possible because the source code for all the software in RHEL is publicly available. The Centos project folks will strip out any RedHat copyright information and recompiled to create the binary RPM packages. All the packages are bundled together into a Linux distribution that was easy to install.
Centos is a popular distribution because it mirrors RHEL and provides the corresponding software updates. It has the same 10 years of support life span as RHEL. It has also been incorporated into many commercial software/hardware products.
In Jan 2014, Red Hat announced their hiring of the Centos team and acquisition of the Centos project. Centos still maintained its independence from Red Hat with its own governing board. This change was positive as it gave financial stability to the Centos team and helped to keep the Centos distribution and update releases on a consistent pace.
IBM acquisition of Red Hat closed on July 9, 2019. It was in no doubt that there will be changes coming. In December 2020, Red Hat unilaterally terminated CentOS development. Red Hat will however continue to support the related rolling release distribution called CentOS Stream.

Centos 8 will ceased to be supported on 31st December 2021. CentOS Stream is replace it but it will no longer be one to one compatible with RHEL 8. Software will be changing all the time and eventually it will become the next RHEL release. In the development cycle, CentOS Stream will be positioned between Fedora and RHEL. CentOS Stream will not be suitable for production use due to the software changes. To put it plainly, Centos Stream is like a RHEL Beta which will used for developing new features for the next RHEL release.
The Centos user community was incensed on hearing this announcement. Those who have implemented Centos 8 were placed in a untenable position because instead of a End of Life date of May 2029, Centos 8 support will end in 1 years time.
Subsequently 2 projects were started to provide a replacement to Centos 8.
Rocky Linux

Almalinux

Rocky Linux is led by Gregory Kurtzer, founder of the CentOS project. The current ETA for a beta release is April 30th.
Almalinux is a project run by The AlmaLinux OS Foundation. Cloudlinux Inc backs the Almalinux project. Cloudlinux Inc makes a Linux distribution CloudLinux OS marketed to shared hosting providers. CloudLinux OS is based on the CentOS operating system; it uses the OpenVZ kernel and the rpm package manager.
Rocky Linux starts from ground zero however Almalinux is being worked on by a team that has already produced a fork of RHEL 8 for CloudLinux OS.
On Mar 30 2021, Amalinux 8.3 was officially released. On Mar 31, using the migration script provided almalinux-deploy. I successfully did a inplace switch to Almalinux from Centos 8. After the script performs a few initial checks, it began the process of removing, reinstalling, downgrading, and upgrading certain packages in order to synchronize the system with the current AlmaLinux release. The entire process took about 20mins which concluded by rebooting the system.
Almalinux being 1::1 compatible, everything works. Already there features that it provides which was missing from Centos. Almalinux maintains the errata information in their repositories. Therefore you can retrieve only updates related to security or perform queries based on types of errata.
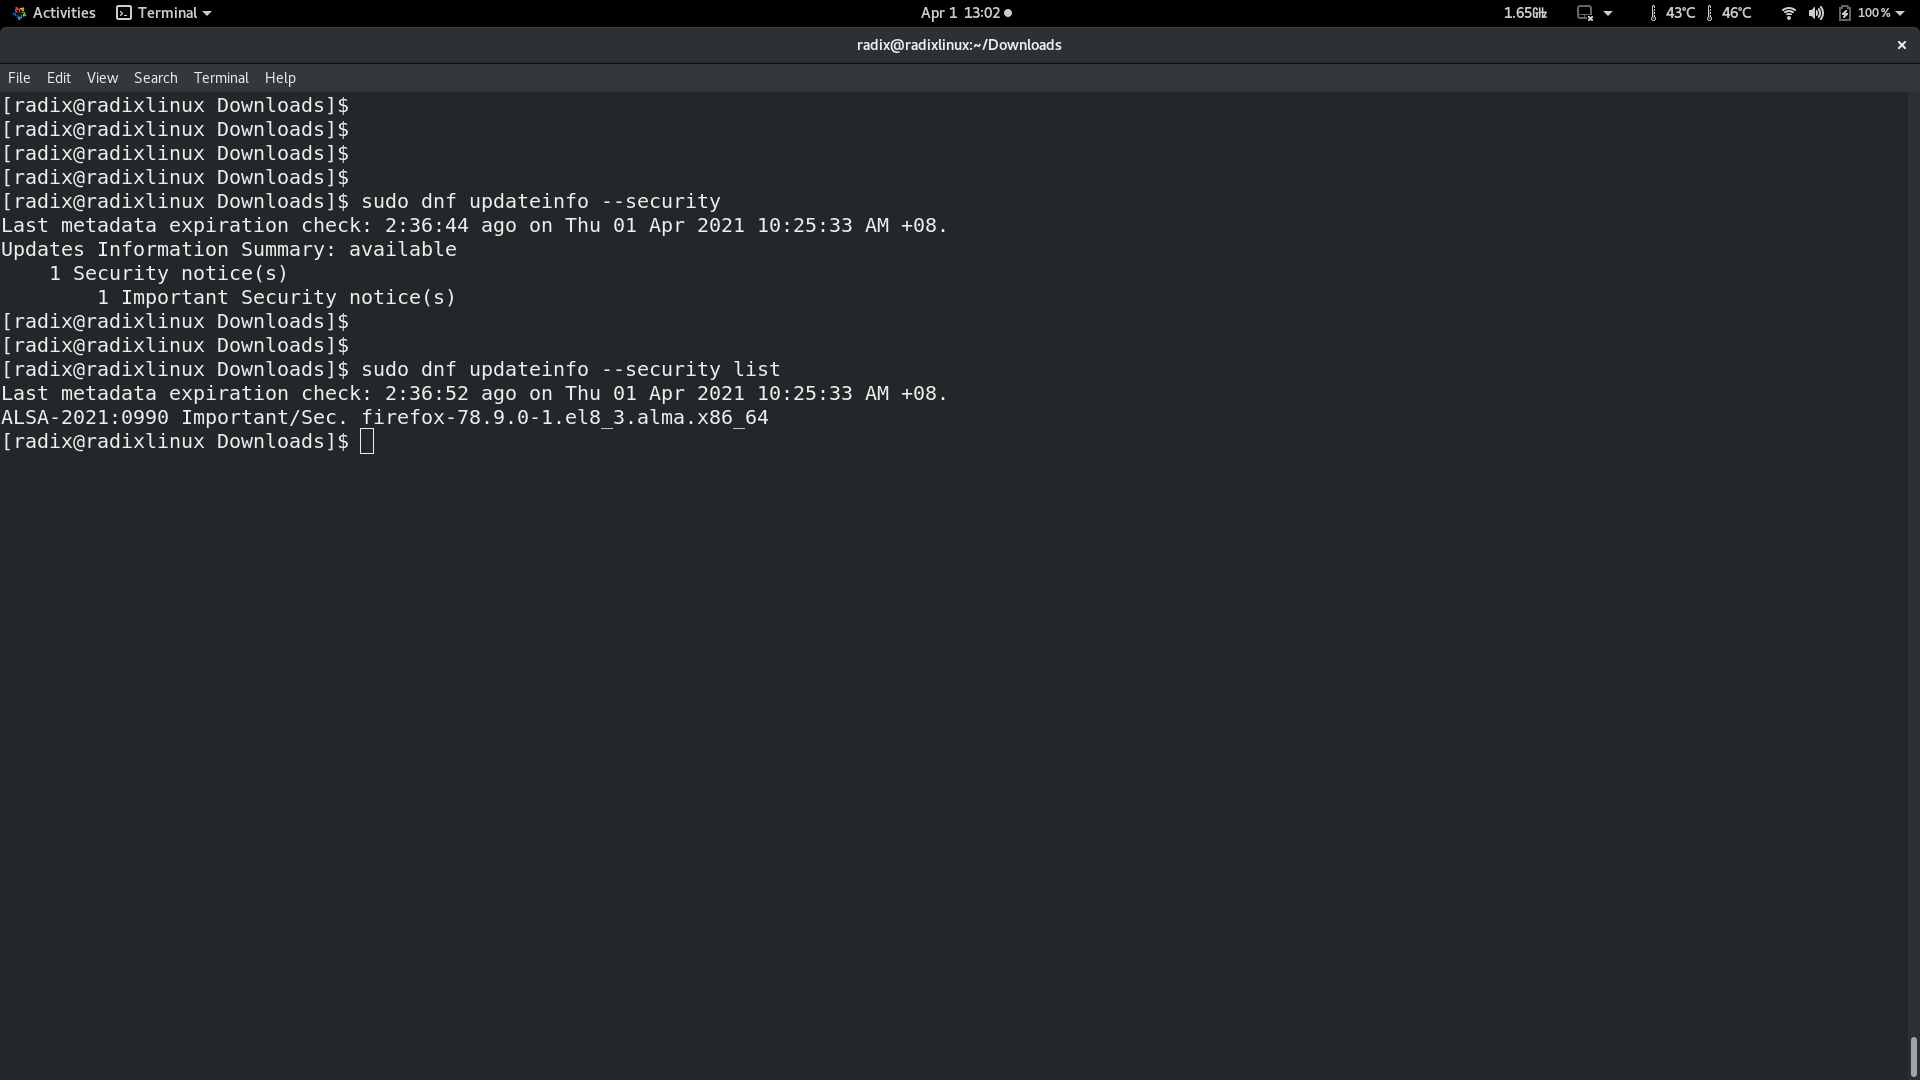
The other observable improvement is the speed of updates. Two recent flaws have been found in openssl, which were deemed important. Redhat patched their source code on March 24-25 and released openssl packages for RHEL8 on March 30.
AlmaLinux had updated openssl packages by March 31st. Centos will probably take awhile longer to release their updates. To be fair, Centos will provide quick update responses for critical security patches.
Mar 25, 2021
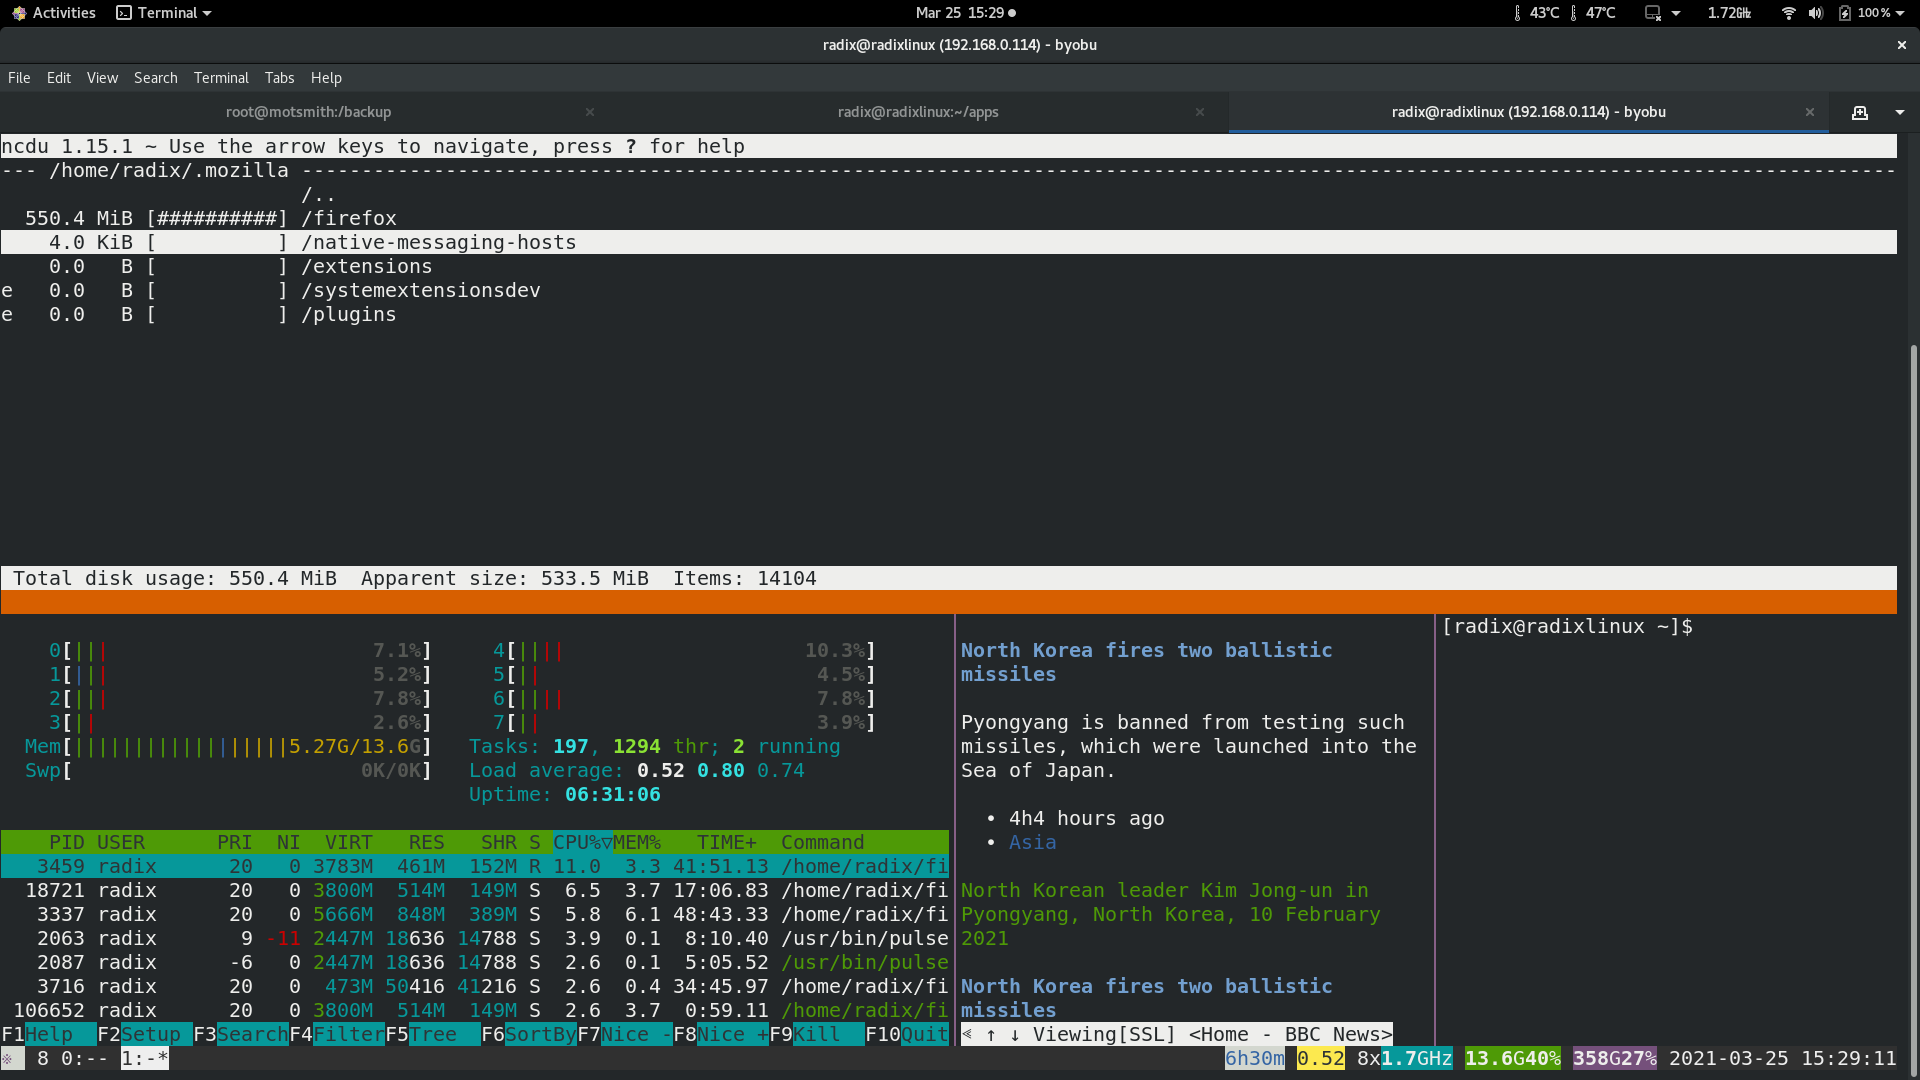 Byobu is a GPLv3 open source text-based window manager and terminal multiplexer. Byobu includes an enhanced profiles, convenient keybindings, configuration utilities, and toggle-able system status notifications for both the GNU Screen window manager and the more modern Tmux terminal multiplexer.
The key benefits are:
It provides easier to remember keybinding to Screen/Tmux.
Terminal sharing is easily done with just two terminal sessions ( same user account ) running byobu.
Automatic resumption of terminal session if remote is reconnected
Byobu defaults to launching tmux.
KEYBINDINGS
byobu keybindings can be user defined in /usr/share/byobu/keybindings/ (or within .screenrc if byobu-export was used). The common key bindings are:
   F2 - Create a new window

   F3 - Move to previous window

   F4 - Move to next window

   F5 - Reload profile

   F6 - Detach from this session

   F7 - Enter copy/scrollback mode

   F8 - Re-title a window

   F9 - Configuration Menu

   F12 -  Lock this terminal

   shift-F2 - Split the screen horizontally

   ctrl-F2 - Split the screen vertically

   shift-F3 - Shift the focus to the previous split region

   shift-F4 - Shift the focus to the next split region

   shift-F5 - Join all splits

   ctrl-F6 - Remove this split

   ctrl-F5 - Reconnect GPG and SSH sockets

   shift-F6 - Detach, but do not logout

   alt-pgup - Enter scrollback mode

   alt-pgdn - Enter scrollback mode

   Ctrl-a $ - show detailed status

   Ctrl-a R - Reload profile

   Ctrl-a ! - Toggle key bindings on and off

   Ctrl-a k - Kill the current window

   Ctrl-a ~ - Save the current window's scrollback buffer
SCROLLBACK, COPY, PASTE MODES
Each window in Byobu has up to 10,000 lines of scrollback history, which you can enter and navigate using the alt-pgup and alt-pgdn keys. Exit
this scrollback mode by hitting enter. You can also easily copy and paste text from scrollback mode. To do so, enter scrollback using alt-pgup
or alt-pgdn, press the spacebar to start highlighting text, use up/down/left/right/pgup/pgdn to select the text, and press enter to copy the
text. You can then paste the text using alt-insert or ctrl-a-].
Mar 18, 2021
 Every Linux distribution has a default method for managing the installation/removal/updating of software. Suse/Redhat/Centos/Fedora uses the RPM package manager to manage rpm packages. Debian/Ubuntu uses dep packages with the corresponding tools to manage them.
There are now alternative method of installing Linux software applications which tries to solve the typical problems of software compatibility issues like having the required libraries and specific versions of software.
Snap
Snap are app packages for desktop, cloud and IoT that are easy to install, secure, cross‐platform and dependency‐free. Developed and supported by Canonical, it has a repository of snap packages at snapcraft.io. There you will find a very large collection of free and propriety software installed via snap tools. Snap tools are available for many Linux distributions.
Flatpak
Flatpak touts itself as the future of software distribution for desktop software for Linux. This means it does not have server type of application which limits it pool of software. It has the least number of packages among the 3 software distribution tools being discussed. It was co-developed by RedHat. List of their packaged software can be found here Flatpak Software List. Flatpak has only free software and the Flatpak tools are supported by 28 Linux distributions.
AppImage
AppImage approach is the simplest of the 3 mentioned, one file, make it executable and then run it. All libraries and associated software are included in that one file. Surprisingly their packages are also smaller than those from Flatpak and Snap. You will find a list 1000 over software at AppImage software list